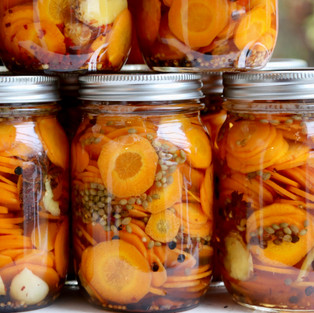
Gift Idea: Small Batch Kimchi-Spiced Carrot or Radish Pickles + Marinade
- Upfront & Beautiful
- Dec 17, 2020
- 6 min read

It isn't too late to make 'gourmet food store quality' gifts for friends and family, and do it for as little as $0.80 per jar. If you don't already have canning jars, your all-in gift cost could go up to a whopping $1.40 per jar. We have provided a fun label/hang tag for download.
No experience necessary to make these 3-in-1 garden to table gifts. Anyone with basic kitchen equipment, access to a grocery store, and a few hours preparation, execution, and packaging time, can be successful. The pickles are ready to eat right away, but benefit by six weeks or so in the jar before opening. You can download our label if you don't have the tools to create your own, and print them out at home. When you are done, you will have a half-dozen beautiful gourmet gifts for less than $10.
If you grow your own carrots, radishes, garlic and ginger, your cost per jar will go down, and if you use only organic ingredients, your cost per jar will go up. I based the costs per jar, on conventional produce and brand name jars, purchased at a chain grocery store.

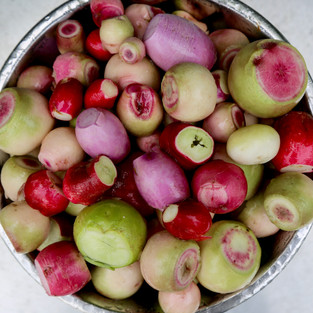
I make these Asian-spiced carrots and radishes by the dozens of jars per occasion, simply because I share them with friends, and my family can go through a jar or two every week. We add them whole or diced to sandwiches, omelets, stir fries, grain/bean/vegetable salads, and of course snack straight from the jar. The spice profile is lovely and somewhat mainstream as far as blends go. I think of the recipe as kimchi-spiced because I first used it for pickling an overabundance of home-grown spicy wasabi and purple daikon radishes, which together with the ginger and garlic spiced pickling brine tasted similar to home-made vegan kimchi.

The spice blend is a recommendation only, entirely open to interpretation. You can go heavy on the ginger, coriander and peppercorns to create a Thai-inspired pickle (maybe add some sliced lemon grass), or lean more heavily on the star anise (maybe add a small piece of cinnamon stick) to create a Moroccan-inspired pickle. Carrots are more neutral, and radishes pack some heat, so keep that in mind when deciding which direction to go.
No matter which vegetable you choose to pickle, don't forget that the left-over pickling liquid is complex and delicious in its own right, and can be used as a flavourful marinade for chicken or pork, or to combine with olive or avocado oil to make a gorgeous vinaigrette for vegetable, grain, rice, or fruit salads. In true permaculture fashion, absolutely nothing is wasted, from garden or green grocer to table.


When I use the pickling liquid as a meat marinade, I turn the used marinade into a finishing glaze for the cooked meat. It's really easy to do. Once the chicken or pork had been removed from the marinade for cooking, transfer the marinade to a small pot, and over medium high heat bring the marinade to a boil to kill any pathogens (don't forget this step) from the raw meat. Continue to boil until reduced to a syrupy consistency that coats the back of a spoon. Reduce the heat to low and add honey, sugar, agave or preferred sweetener to taste, plus salt and pepper. Brush the cooked meat with the glaze and broil or grill for just a few minutes to finish, to caramelize and turn lovely and brown.
For six garden-to-table gifts, you will need the following ingredients:
3.5 lbs (1.6 kilos) carrots, or any variety radishes (daikon are widely available)
3.5 cups (875 ml) plain white vinegar (5% acetic acid by volume)
3.5 cups (875 ml) water
1.5 cups plus 2 tablespoons (225 gr) white sugar
2.25 tablespoons (35 gr) sea salt (or Kosher salt)
1 thumb-size piece of fresh ginger (60 gr)
12 pieces whole star anise
1 - 2 teaspoons red pepper flakes, to taste
6 teaspoons yellow or brown mustard seeds
6 teaspoons peppercorns (black or multi-colour)
6 tablespoons coriander seeds
12 large cloves garlic, peeled and crushed
six half-pint canning jars with lids (rings and sealer tops)
Tools:
a pot deep enough to allow for the jars to be immersed in water to their depth plus 2-inches (5cm); lid not essential, but helpful. Canning pot helpful, but not essential.
a small round rack that fits into the deep pot, or a canning basket to prevent the jars from sitting directly on the bottom of the pot
a second pot in which to heat the pickling liquid - 4 quart size is large enough
a clean kitchen towel or paper towel to wipe the rims of the jars after filling
a pair of tongs for removing jars from the hot water. Canning tongs are handy but not essential
a cooling rack or towel on which to place the hot jars to cool
a sharp knife (mandoline lovely but not essential)
a cutting board
a vegetable peeler (for carrots only)
measuring spoons and cup (or kitchen scale if preferred)


Method:
First, remove the lids from your jars and sterilize them. I place my rinsed clean and dried jars open-side up on a tray, slightly spaced apart, in a 240F (115C) oven for 20 minutes while I am prepping, but you can also immerse the jars in boiling water for 10 minutes. Either way, handle the sterilized jars with sterile tools once finished, and set aside in a clean area.
Trim, peel and slice carrots (trim, scrub and slice radishes) into thin coins using a sharp knife or a mandoline. Precision isn't essential, but try to keep the width consistent so that 'crunchiness' is uniform. Set aside.
Wash and slice the (un-peeled, if organic) ginger thinly (not paper thin) and set aside. The more surface area to pickling liquid you create, the stronger the ginger flavour, so keep that in mind -- fewer/thicker slices per jar result in less ginger heat, more/thinner slices per jar result in more ginger heat. Set your spices up next to your clean jars, for easy access.
Add the water, vinegar, sugar and salt to a medium-size pot (four quart or larger) set over medium high heat, and bring slowly just to a boil. Meanwhile:
Fill the deep pot 3/4 full of water, immerse the canning rack or circular rack, and bring to a boil over high heat. If the water reaches a boil while you are still filling your jars (below), turn the heat to a high simmer/low boil, but don't turn off the heat.
Fill a clean heat-proof cup or bowl with tap water and bring it just to a boil in the microwave, or use a small pot on the stove. Set aside (this water will be used to clean the jar rims before sealing).
Divide the spices and aromatics evenly amongst the sterilized jars, ideally in layers with the carrots or radishes (half the spices, half the veg slices, half the spices, top with last half veg slices). Or, you can keep it simple as I do, and just divide the spices and aromatics six ways and top with the sliced veg. Press the slices down gently, ensuring that they stay 3/4 of an inch (2 cm) below the rim of the jar.
Turn the pickling liquid off immediately after it reaches a boil, and, using the measuring cup, slowly add the hot liquid to the full jars, filling all six just halfway at first, then filling each to within 1/2 inch of the rim, but no more. Use a clean knife or chopstick to agitate any air bubbles to the surface, then wipe the top edge of the jars with a clean towel or paper towel dipped in the cup of sterile water.

Top each jar with a flat sealer top (follow manufacturer's directions regarding pre-heating to soften sealing medium), and screw on a ring - finger tight only though, not very tight.
Using the tongs, carefully immerse the jars into the large pot of water, one at a time so that they are not touching each other, and using the measuring cup adjust the water level so that it is 2-inches (5 cm) above the level of the jars (add more water from a boiled kettle id needed). Turn the heat to high and return the water to a rolling boil. Once boil is reached, process at a continual boil (covered if you have a lid, but if not OK too) for 10 minutes*. Turn off the heat and leave the jars in the hot water for 10 more minutes before removing the jars with tongs (a kitchen towel wrapped hand under the moving jars prevents accidents). Set the jars a few inches apart from each other in an area where they can remain undisturbed for 24 hours. Depending on the size of your pot, you may have to process the jars in two batches.

Listen for the telltale 'ping' the jar lids make as the temperature equalizes and the vacuum inside the jar pulls the sealer down. Also check to ensure the the little bump at the centre of the sealer has flattened. Any jars that did not seal properly are still perfectly fine, but they will not be shelf-stable and should be refrigerated for immediate enjoyment.
Feel free to download the label PDF, or use it as inspiration to create your own. Print on paper to use as a glue-on labels; or print on lightweight cardstock, punch a hole at the top and tie them around the necks of your jars. Easy peasy! Click to download.

Happy gifting, and happy holidays!
*Preserving fruits and vegetables requires research based on your geographic area, and the published rules and recommendations change occasionally and also with varying altitude (literally). Always check The USDA National Center for Home Food Preservation or Canada's Home Canning Safety Recommendations before proceeding with this or any home preserving or home canning project. Always be aware of allergies, when gifting homemade food products.
Comments